- About Valeport
- Accreditations
- Anti Bribery and Corruption Policy
- Applications
- Articles
- Careers
- Contact
- Cookie Policy
- Modern Slavery and Human Trafficking Policy
- Oceanographic sensors and hydrographic instruments
- Our international distributors
- pH Instrument Trial
- Privacy Policy
- Products
- rapidPro with Valeport Connect
- Services and Calibrations
- Sound Velocity Sensors
- Supplier Requirements
- Support
- Support Form Response
- Terms & Conditions of Sale of Goods & Services
- Test page
- Valeport Logo
- Warranties and Repairs
- Website Terms & Conditions
Updating the impeller calibration for replacement orange impellers
We have recently completed a redesign of the Model 001 and Model 106 current meter impellers to to ensure their continued supply and support. As a result, from the 12th February 2024 we will be switching over to the new impeller, with no change in performance. The only thing customers will notice is a difference in colour with the new impeller being orange rather than yellow.
The new, orange version of the impeller is not compatible with the Model 108 or Model 308.
If you require a replacement impeller to an existing instrument, please contact [email protected].
The instrument will then need its factory calibration string updated. This can easily be completed via a simple application which can be provided by Valeport Support ([email protected]) or via the valeport.download webpage, selecting the Model 001 and Model 106 from the instrument drop-down.
Please note this stage will not be required if you a purchasing a new Model 001 or Model 106 unit, as it will come with an orange impeller pre-fitted and the relevant calibration applied.
New part numbers:
0001SA2-2024 New 001/106 Impeller
0001SA5-2024 New 001/106 nose cone assembly
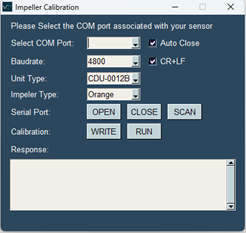
Calibration update procedure:
2. Select a COM Port
Using the drop-down menu, select the COM Port associated with the unit. By Default, the COM port will auto populate if there is a device plugged in.
If a device is plugged in after loading the application, press the SCAN button which will then display the port on the drop-down menu.
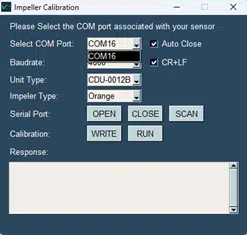
Figure 2 – Selecting the COM Port.
3. Select parameters.
Select the unit to calibrate, either the 106 or CDU-0012B, using the Unit Type drop-down menu. By default, this will be set to the CDU-0012B.
Then, select the impeller type using the Impeller Type drop-down menu. This is set to Orange by default.
3.1 Optional Settings:
Baudrate: If the unit has been configured to have a different baudrate then select the appropriate option from the Baudrate drop-down menu.
Auto Close: Selector to automatically close the serial port after completing the calibration. Defaults to ON.
CR+LF: (DEBUG ONLY) Selector to apply a carriage return and line feed to serial data being sent to the instrument.
4. Open the serial port.
Press the OPEN button to connect to the unit.
On the 106, the output from the unit will be displayed on the terminal if the unit is in run mode.
The CDU will not output anything until the calibration process starts.
4.1 Optional: Set unit to run mode.
If the 106 is not in run mode, or the calibration process fails to set the unit back to run mode, the RUN button can be pressed to set the instrument back into run mode.
N.B. ensure the serial port is open before using the RUN button.
5. Starting the calibration.
5.1 CDU-0012B Calibration:
The CDU has a slightly different procedure.
First, turn on the CDU and navigate to the user calibration setting. Press the set user calibration option.
The unit will then output a sentence to the terminal which means it is now ready to be calibrated.
Press the WRITE button to start the calibration process.
If the settings have been applied successfully, the following message will be displayed:
[SUCCESS] – Settings Applied
The instrument will then return to the calibration menu where the “read calibration” on the CDU can be used to check if the calibration has been applied correctly.
5.2 106 Calibration:
Ensure the serial port is open. IF the unit is powered and set to run mode, serial data should be displayed in the terminal.
Press the WRITE button to start the calibration process.
The instrument will now be interrupted, the calibration will be applied and then the unit will be set to run mode again.
If the settings have been applied successfully, the following message will be displayed:
[SUCCESS] – Settings Applied
If AUTO CLOSE is enabled then the serial port will close.
The Terminal should show the following response:
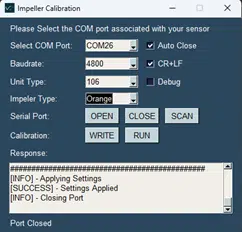
Figure 3 – Successful 106 calibration.
If the Debug check box is selected, the output on the terminal will show the calibration string being sent, and then the response from the instrument showing the newly applied calibration string. This is used to diagnose the device in case of any issues. As shown below:
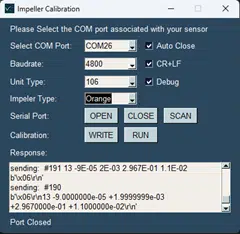
Figure 4 – 106 Calibration with Debug Mode Enabled.
Debug defaults to OFF.
If you experience any issues with this process, please contact our support team ([email protected]).